> ## Documentation Index
> Fetch the complete documentation index at: https://www.vobiz.ai/docs/llms.txt
> Use this file to discover all available pages before exploring further.
# Expedify integration
> Connect Expedify's CRM and AI calling platform to Vobiz - configure outbound and inbound voice with your Auth ID, Auth Token, and Caller IDs from the Expedify dashboard, no code required.
Expedify is a CRM and outreach platform with built-in AI agents - a Calling Agent, a Customer Support Agent, and a Lead Qualifier Agent among them. The **Vobiz Voice** integration is available directly from Expedify's integrations marketplace, and connects your Vobiz account so Expedify can place and receive calls on a number you already own.
This integration is configured entirely in the Expedify dashboard and the Vobiz Console. There is no code to write and nothing to host.
## What you get
* **Outbound calls** - placed manually by a rep, or driven by an Expedify AI calling agent, from a Vobiz Caller ID you nominate.
* **Inbound calls** - calls to your Vobiz number routed into Expedify through a Vobiz application.
* **Recording and transcription** - Vobiz records the call; Expedify transcribes it with its own transcriber when you enable that option.
## Prerequisites
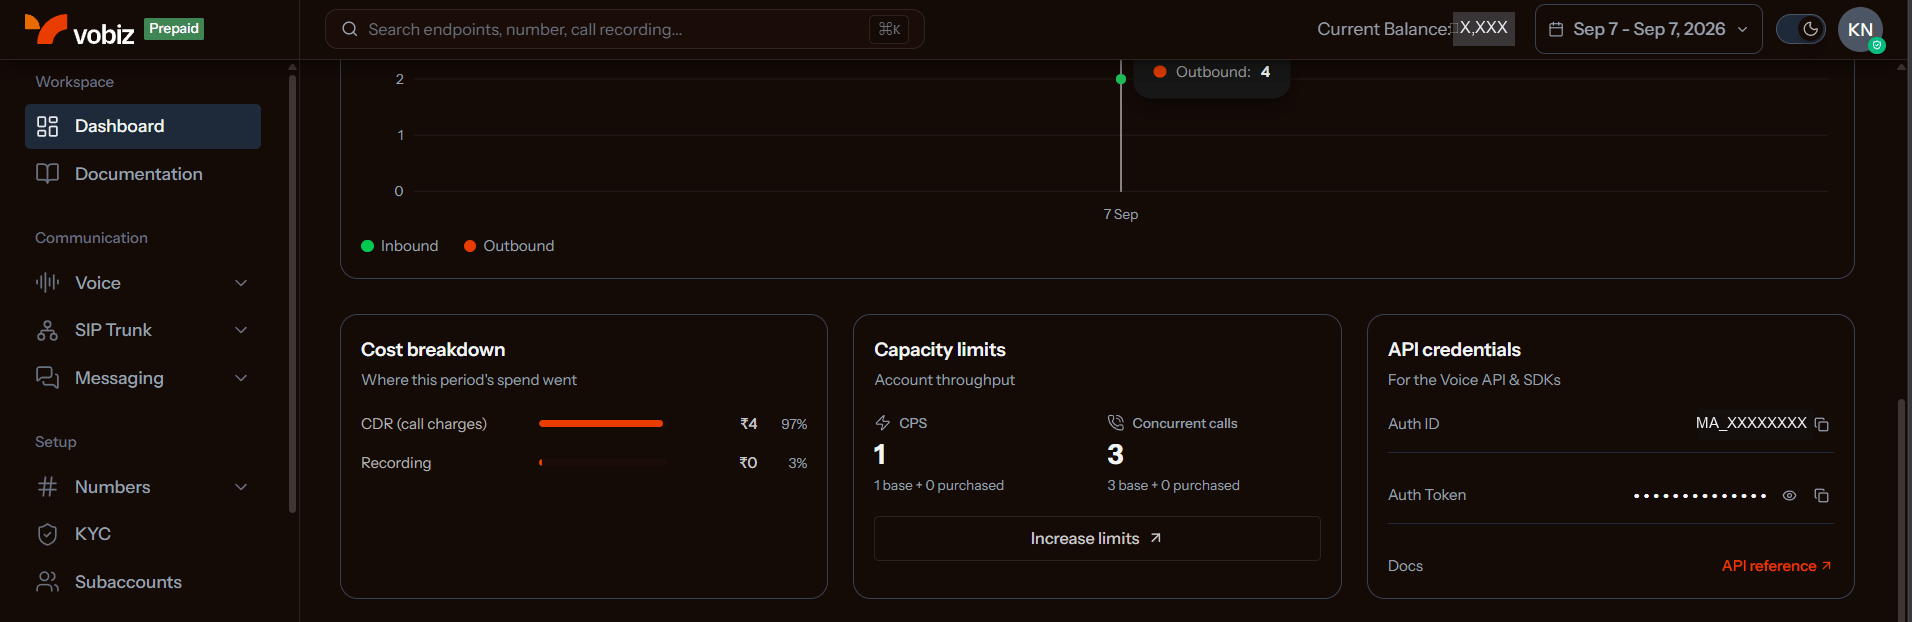
You need your **Auth ID** and **Auth Token**. Both are on the Console [Dashboard](https://console.vobiz.ai), under **API credentials**.
At least one DID to use as a Caller ID. See [Buy a phone number](/docs/buy-a-phone-number) if you do not have one yet.
Access to the Expedify organization where you want Vobiz connected. Integrations are scoped per organization - if your account has several, confirm you are in the right one before you start.
## Step 1: Open Expedify's integration settings
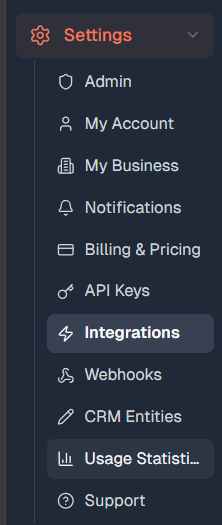
In Expedify, go to **Settings → Integrations**.
 ## Step 2: Add the Vobiz Voice integration
Open the **Add Integrations** tab, find **Vobiz Voice** under the **Voice** category, and click **Configure**.
## Step 2: Add the Vobiz Voice integration
Open the **Add Integrations** tab, find **Vobiz Voice** under the **Voice** category, and click **Configure**.
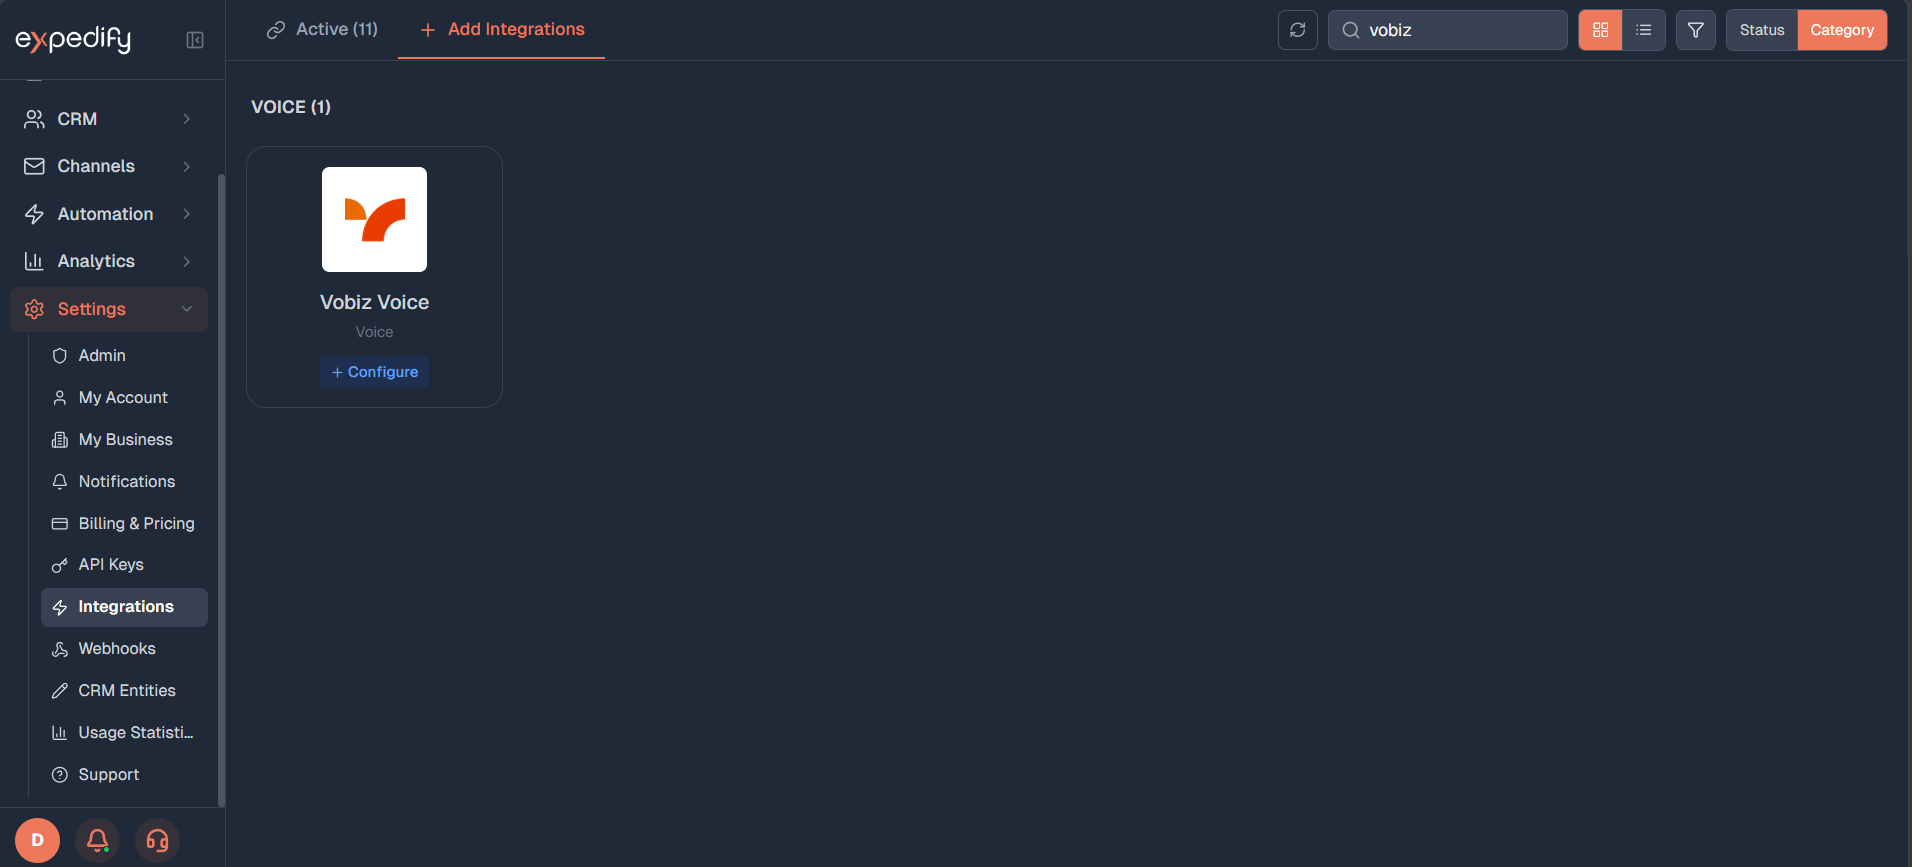 The configuration panel has two tabs, **Configuration** and **Connection Guide**. Everything in this guide happens on the **Configuration** tab.
## Step 3: Get your Vobiz Auth ID and Auth Token
Log in to the [Vobiz Console](https://console.vobiz.ai). Your **Auth ID** and **Auth Token** are on the **Dashboard**, in the **API credentials** card. Use the copy icon next to each - the Auth Token is masked until you reveal it.
The configuration panel has two tabs, **Configuration** and **Connection Guide**. Everything in this guide happens on the **Configuration** tab.
## Step 3: Get your Vobiz Auth ID and Auth Token
Log in to the [Vobiz Console](https://console.vobiz.ai). Your **Auth ID** and **Auth Token** are on the **Dashboard**, in the **API credentials** card. Use the copy icon next to each - the Auth Token is masked until you reveal it.
 Treat your Auth Token like a password. Anyone who has it can place calls and spend your Vobiz balance. Paste it straight into Expedify and nowhere else. If it leaks, regenerate it from the Console immediately - the old token stops working as soon as you do.
## Step 4: Enter your credentials
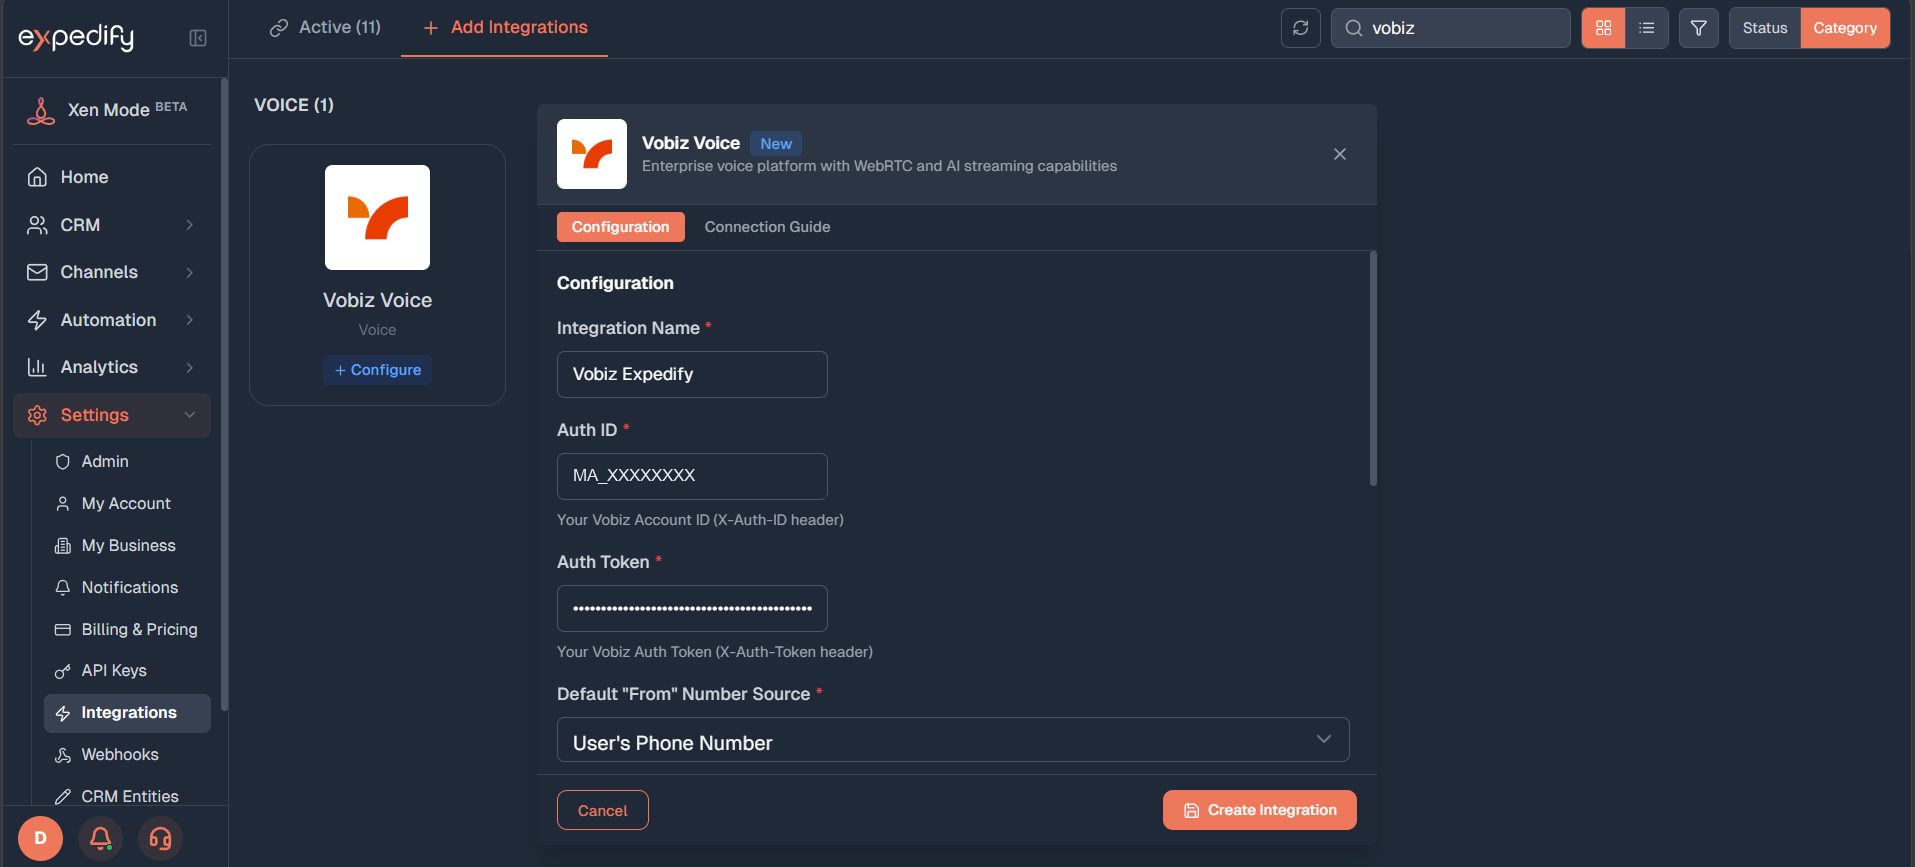
Back in Expedify, name the integration - `Vobiz Expedify`, for example - then paste your **Auth ID** and **Auth Token**.
Set **Default "From" Number Source** and **Default "To" Number Source**. These decide which field Expedify reads when it places a call. The example below uses *User's Phone Number* and *Contact's Phone Number*.
Treat your Auth Token like a password. Anyone who has it can place calls and spend your Vobiz balance. Paste it straight into Expedify and nowhere else. If it leaks, regenerate it from the Console immediately - the old token stops working as soon as you do.
## Step 4: Enter your credentials
Back in Expedify, name the integration - `Vobiz Expedify`, for example - then paste your **Auth ID** and **Auth Token**.
Set **Default "From" Number Source** and **Default "To" Number Source**. These decide which field Expedify reads when it places a call. The example below uses *User's Phone Number* and *Contact's Phone Number*.
 ## Step 5: Add a Caller ID
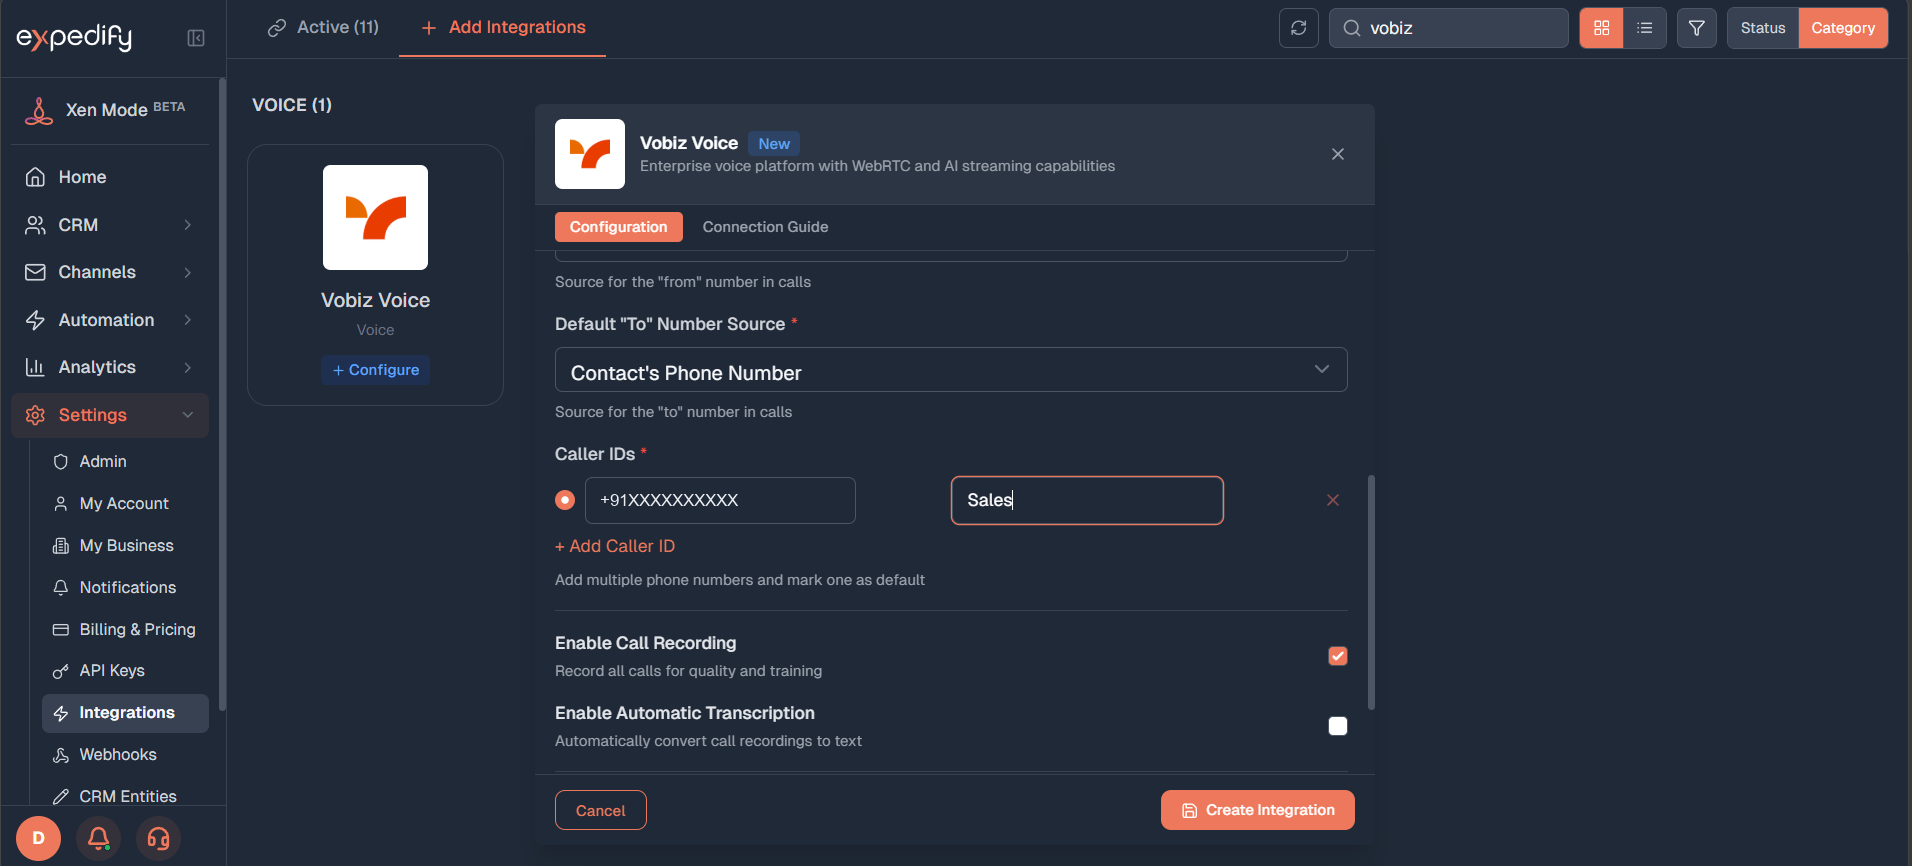
Scroll down to **Caller IDs**. You need at least one Vobiz number here before Expedify can place an outbound call.
Click **+ Add Caller ID**, enter the number in E.164 format, and give it a label such as `Sales`. You can add several and mark one as the default.
Then set the call handling options:
* **Enable Call Recording** - on by default. Vobiz records the call.
* **Enable Automatic Transcription** - off by default. Expedify converts the recording to text using its own transcriber.
## Step 5: Add a Caller ID
Scroll down to **Caller IDs**. You need at least one Vobiz number here before Expedify can place an outbound call.
Click **+ Add Caller ID**, enter the number in E.164 format, and give it a label such as `Sales`. You can add several and mark one as the default.
Then set the call handling options:
* **Enable Call Recording** - on by default. Vobiz records the call.
* **Enable Automatic Transcription** - off by default. Expedify converts the recording to text using its own transcriber.
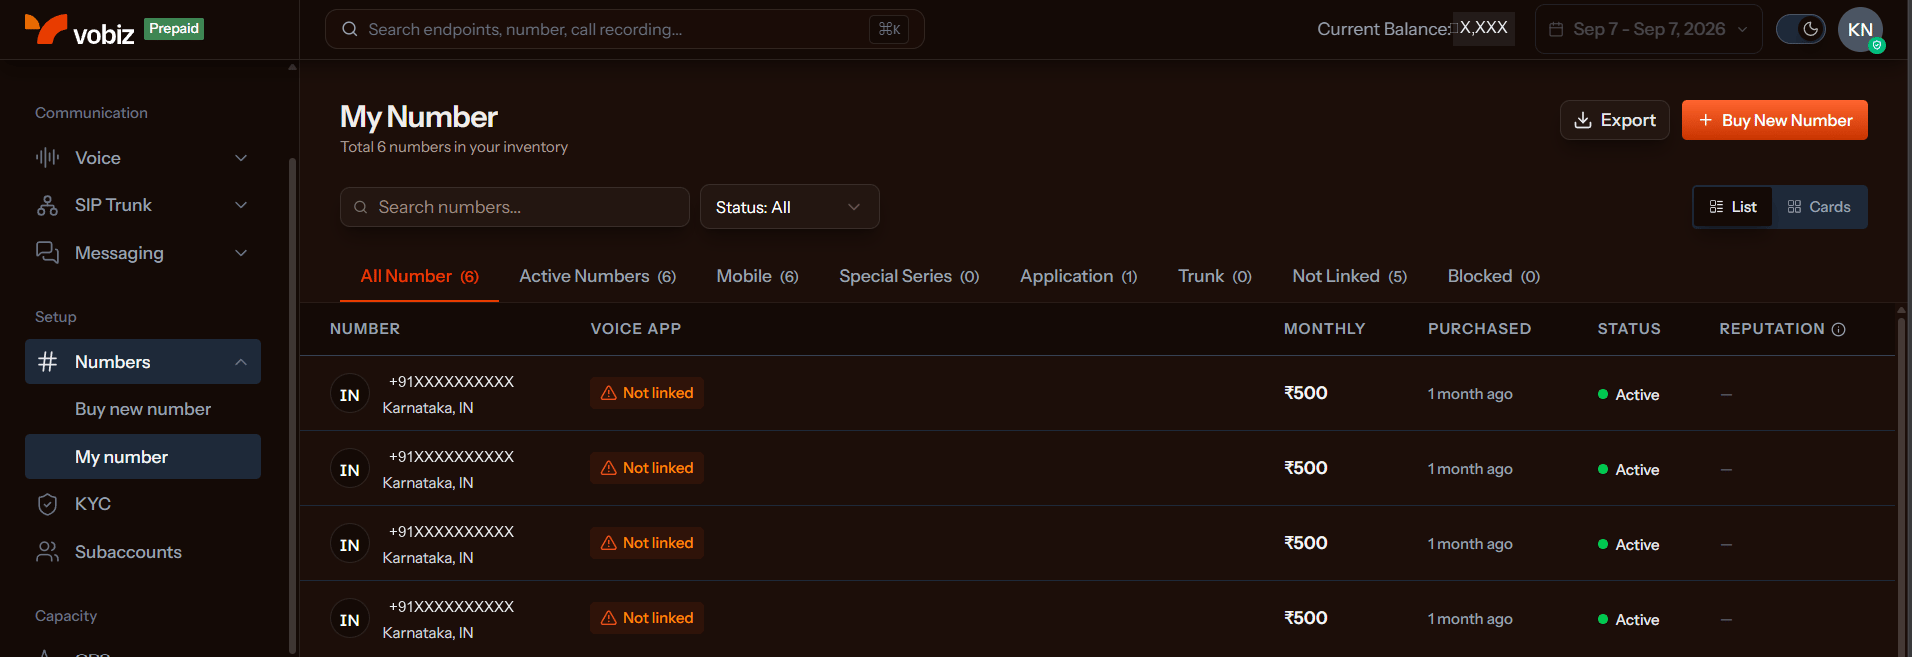
 Need a number first? In the Vobiz Console go to **Numbers → My number** and click **Buy New Number**.
 ## Step 6: Create the integration
Click **Create Integration**. It appears under **Active** integrations, marked **Active** - and **Default**, if it is your only voice integration.
## Step 6: Create the integration
Click **Create Integration**. It appears under **Active** integrations, marked **Active** - and **Default**, if it is your only voice integration.
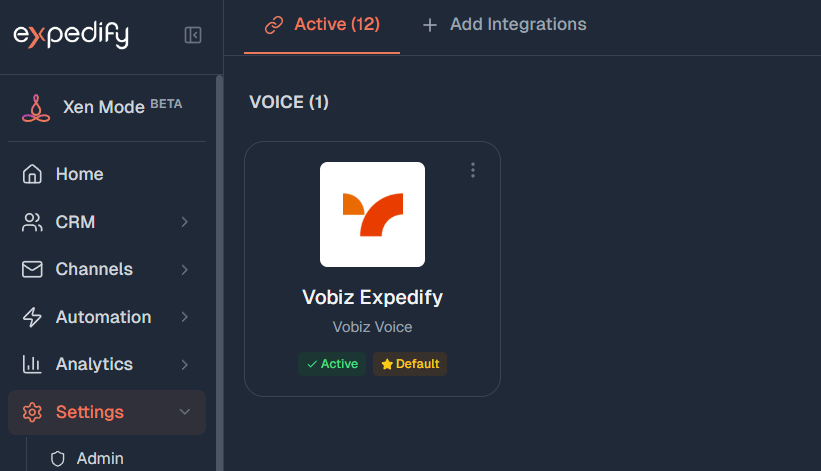 Outbound is ready. Expedify can now place calls - manually or through an AI calling agent - using your Vobiz Caller ID.
## Verify with a test call
Open the integration from the **Active** tab and click **Test Call**.
Outbound is ready. Expedify can now place calls - manually or through an AI calling agent - using your Vobiz Caller ID.
## Verify with a test call
Open the integration from the **Active** tab and click **Test Call**.
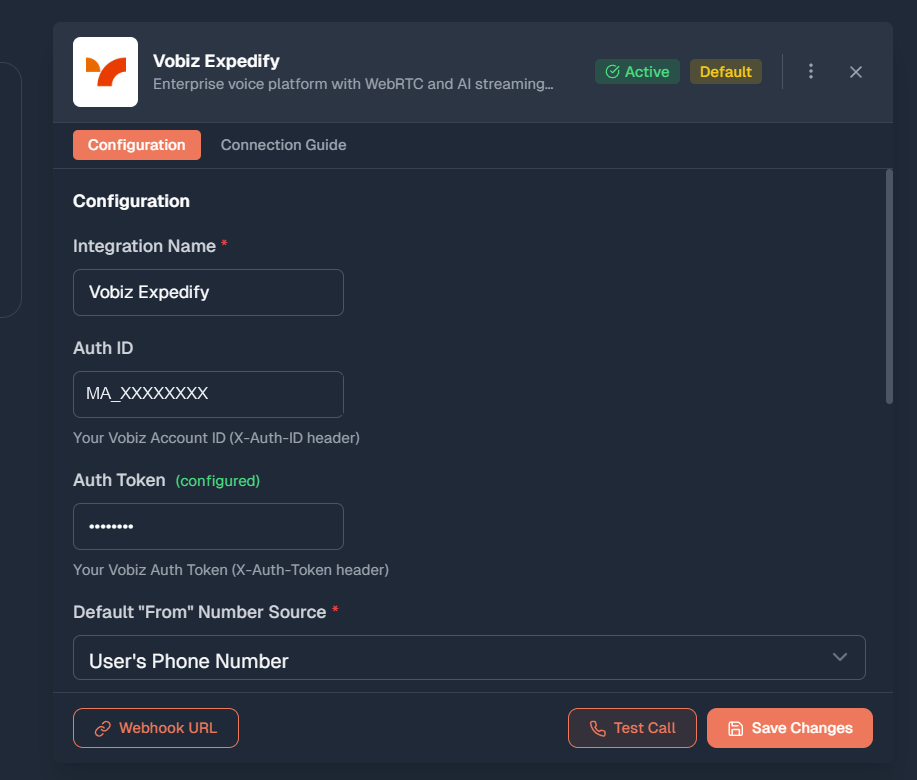 Enter a **From Number** and a **To Number** in E.164 format, optionally edit the **Test Message**, and click **Test Call**.
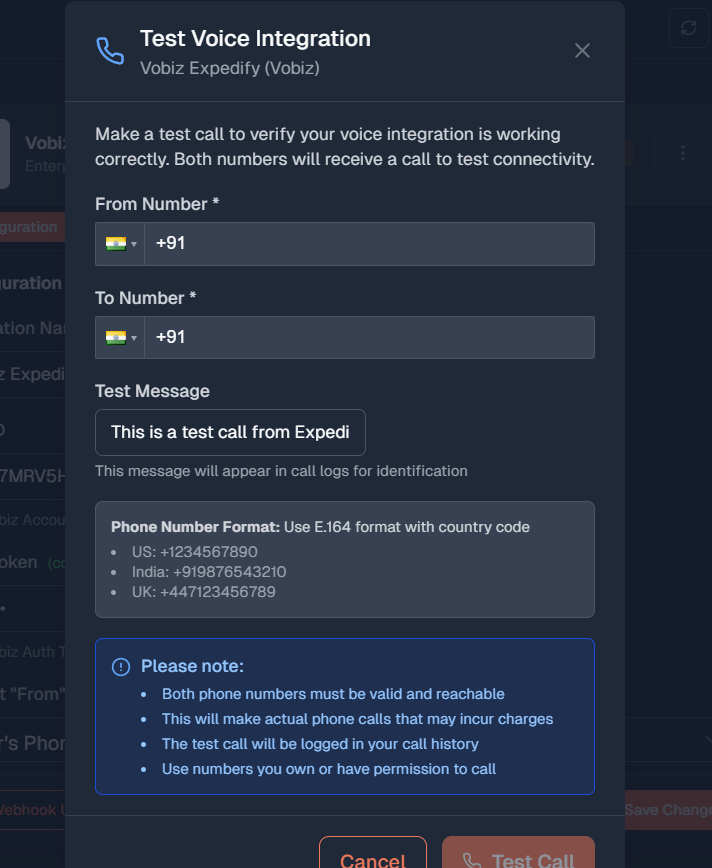 A test call is a real call. **Both numbers ring**, and both legs are billed to your Vobiz balance. Use numbers you own or have permission to call.
Both numbers ring. Answer either leg to confirm audio, and the integration is verified end to end.
## Receive inbound calls
This part is optional. Set it up when you want calls made *to* your Vobiz number to land in Expedify.
Open the integration and click **Webhook URL**. Copy the **inbound call URL** and the **status callback URL**.
In the Vobiz Console go to **Voice → Application → Create New Application**.
Name it - `Expedify`, for example - set the type to **Inbound calls**, and paste Expedify's inbound call URL and status callback URL into the matching fields. The URLs must match exactly.
Click **Create Application**, then attach your Vobiz number to it.
See [Applications](/docs/applications) for the full field reference.
Inbound is ready. Calls to your Vobiz number now route into Expedify.
## Configuration reference
| Field | Where it comes from | Example | Notes |
| ------------------------------ | ----------------------------------- | ---------------------- | ----------------------------------------------------- |
| Integration Name | You choose it | `Vobiz Expedify` | Label only. Shown in Expedify's integration list. |
| Auth ID | Console Dashboard → API credentials | `MA_XXXXXXXX` | Sent by Expedify as the `X-Auth-ID` header. |
| Auth Token | Console Dashboard → API credentials | - | Sent as the `X-Auth-Token` header. Masked once saved. |
| Default "From" Number Source | Dropdown | User's Phone Number | Which CRM field supplies the caller's number. |
| Default "To" Number Source | Dropdown | Contact's Phone Number | Which CRM field supplies the number dialled. |
| Caller IDs | Your Vobiz numbers | `+91XXXXXXXXXX` | At least one required. Mark one as default. |
| Enable Call Recording | Toggle | On | On by default. Vobiz records the call. |
| Enable Automatic Transcription | Toggle | Off | Expedify transcribes the recording itself. |
## Troubleshooting
Auth ID and Auth Token are both required, and both must be copied exactly from the Console Dashboard. A trailing space or a partial copy is the most common cause - re-copy each with the copy icon rather than selecting the text by hand.
Confirm both numbers are in E.164 format with the country code, for example `+919876543210`. Then check your Vobiz balance covers **two** call legs - a test call dials both numbers.
Check **Default "From" Number Source**, then check your **Caller IDs**. If you have added more than one, confirm the number you expect is the one marked default.
Confirm the Vobiz application's inbound call URL and status callback URL match exactly what Expedify's **Webhook URL** button shows, that the application type is **Inbound calls**, and that your number is attached to that application.
**Enable Call Recording** is set per integration, not per Caller ID. Open the integration, confirm the toggle is on, and click **Save Changes**. Recordings for calls placed before you enabled it are not created retroactively.
## Next steps
Add more DIDs to use as Expedify Caller IDs.
The full field reference for the inbound application.
Retrieve and manage recordings from the Vobiz API.
Credentials, numbers, applications, and balance.
Need help? Email [support@vobiz.ai](mailto:support@vobiz.ai) for anything on the Vobiz side. For Expedify itself, use the headset icon in the Expedify sidebar.
A test call is a real call. **Both numbers ring**, and both legs are billed to your Vobiz balance. Use numbers you own or have permission to call.
Both numbers ring. Answer either leg to confirm audio, and the integration is verified end to end.
## Receive inbound calls
This part is optional. Set it up when you want calls made *to* your Vobiz number to land in Expedify.
Open the integration and click **Webhook URL**. Copy the **inbound call URL** and the **status callback URL**.
In the Vobiz Console go to **Voice → Application → Create New Application**.
Name it - `Expedify`, for example - set the type to **Inbound calls**, and paste Expedify's inbound call URL and status callback URL into the matching fields. The URLs must match exactly.
Click **Create Application**, then attach your Vobiz number to it.
See [Applications](/docs/applications) for the full field reference.
Inbound is ready. Calls to your Vobiz number now route into Expedify.
## Configuration reference
| Field | Where it comes from | Example | Notes |
| ------------------------------ | ----------------------------------- | ---------------------- | ----------------------------------------------------- |
| Integration Name | You choose it | `Vobiz Expedify` | Label only. Shown in Expedify's integration list. |
| Auth ID | Console Dashboard → API credentials | `MA_XXXXXXXX` | Sent by Expedify as the `X-Auth-ID` header. |
| Auth Token | Console Dashboard → API credentials | - | Sent as the `X-Auth-Token` header. Masked once saved. |
| Default "From" Number Source | Dropdown | User's Phone Number | Which CRM field supplies the caller's number. |
| Default "To" Number Source | Dropdown | Contact's Phone Number | Which CRM field supplies the number dialled. |
| Caller IDs | Your Vobiz numbers | `+91XXXXXXXXXX` | At least one required. Mark one as default. |
| Enable Call Recording | Toggle | On | On by default. Vobiz records the call. |
| Enable Automatic Transcription | Toggle | Off | Expedify transcribes the recording itself. |
## Troubleshooting
Auth ID and Auth Token are both required, and both must be copied exactly from the Console Dashboard. A trailing space or a partial copy is the most common cause - re-copy each with the copy icon rather than selecting the text by hand.
Confirm both numbers are in E.164 format with the country code, for example `+919876543210`. Then check your Vobiz balance covers **two** call legs - a test call dials both numbers.
Check **Default "From" Number Source**, then check your **Caller IDs**. If you have added more than one, confirm the number you expect is the one marked default.
Confirm the Vobiz application's inbound call URL and status callback URL match exactly what Expedify's **Webhook URL** button shows, that the application type is **Inbound calls**, and that your number is attached to that application.
**Enable Call Recording** is set per integration, not per Caller ID. Open the integration, confirm the toggle is on, and click **Save Changes**. Recordings for calls placed before you enabled it are not created retroactively.
## Next steps
Add more DIDs to use as Expedify Caller IDs.
The full field reference for the inbound application.
Retrieve and manage recordings from the Vobiz API.
Credentials, numbers, applications, and balance.
Need help? Email [support@vobiz.ai](mailto:support@vobiz.ai) for anything on the Vobiz side. For Expedify itself, use the headset icon in the Expedify sidebar.